There’s a specific kind of Sunday afternoon — grey sky, nothing planned, a bowl of bananas going too soft on the counter — where you just *need* something sweet. Not elaborate. Not a project. Just something that scratches the itch and doesn’t make you feel terrible after.
That’s genuinely how this recipe came into my life. I had two very ripe bananas, a jar of almond butter, and cocoa powder I’d been meaning to use for something. I wasn’t planning a recipe. I was honestly just tired of throwing out bananas and too lazy to go to the store.
So I mashed, mixed, and baked. And the result? These **healthy banana brownies (3 ingredient, flourless)** that I now make on a near-weekly rotation. They’re not pretending to be fudge-box brownies — they’re their own thing. And once you stop comparing, you’ll actually prefer them.
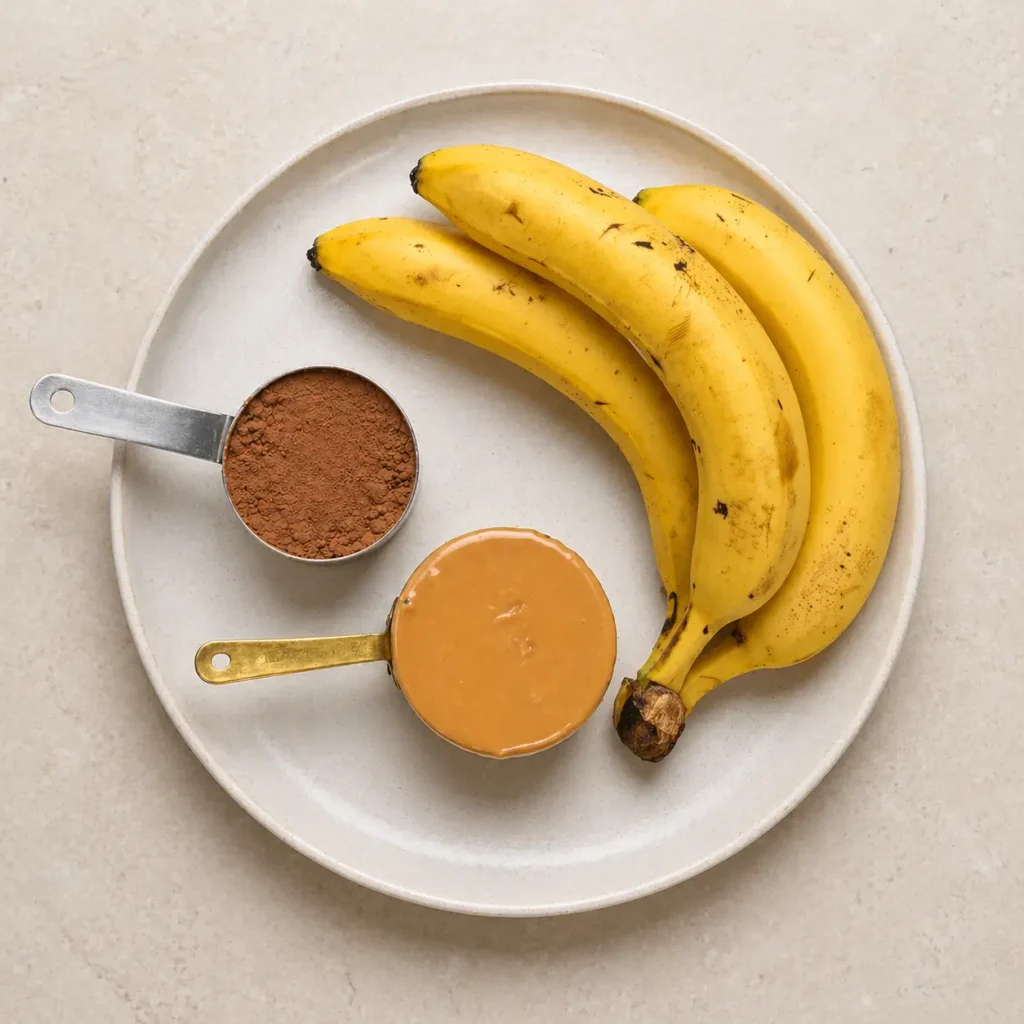
What You Need — Just 3 Ingredients
The beauty here is that there’s almost no grocery list. These are healthy baked treats built entirely on pantry and fruit bowl staples.
The 3 Core Ingredients:
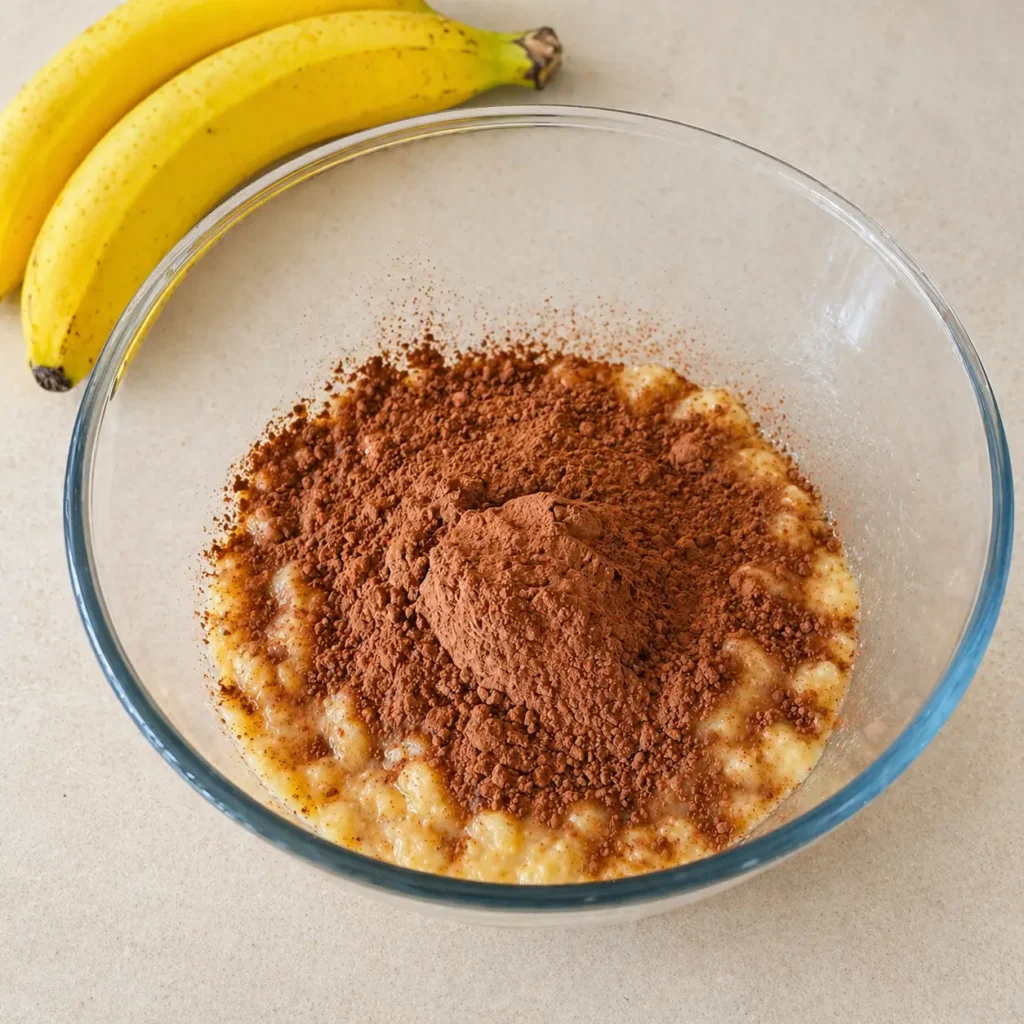
2 large very ripe bananas — the riper, the better. We’re talking fully spotted, almost black peels. The natural sugars are at their peak, and the texture softens enough to act as both a binder and a sweetener. If your bananas are still yellow, the brownies will taste starchy and flat.
½ cup almond butter (or any nut/seed butter) — this is your fat and structure. It creates richness and that slightly dense, fudgy feel. Use a natural, runny almond butter — the kind where the oil separates at the top. Thick, sugary nut butters will make the texture grainy.
¼ cup unsweetened cocoa powder — this is where the brownie flavor actually comes from. Use a good quality cocoa. It makes a difference, I promise.
That’s genuinely it. Three things. One bowl. No flour, no eggs, no refined sugar.

How to Make Healthy Banana Brownies (3 Ingredient, Flourless)
Preheat your oven to 350°F (175°C). Line an 8×8 in8×8-inchg pan with parchment paper — let the edges overhang so you can lift the whole slab out cleanly.
Step 1 — Mash the bananas. In a large bowl, mash the ripe bananas with a fork until completely smooth. Take your time here. Lumps = uneven texture in the final brownie. You want something almost like banana purée.
Step 2 — Mix in the almond butter. Add the almond butter and stir well. The mixture will look a little odd at this stage — thick, slightly gluey. That’s normal. Keep going.
Step 3 — Add the cocoa powder. Sift it in if you can (no lumpy cocoa pockets). Stir until the batter is uniformly dark and glossy. Taste it. Does it need a tiny pinch of salt? Add it. Does it need a drop of vanilla? Go for it. These small additions aren’t required, but they round out the flavor.
Step 4 — Spread and bake. Pour the batter into your prepared pan. It’ll be thick — use the back of a spoon or a spatula to push it evenly into the corners. Bake for 20 to 22 minutes, until the edges are set and the center looks just slightly underdone.
Step 5 — Cool completely. This is where most people make the mistake. The brownies need at least 20 minutes to cool in the pan before cutting. They firm up as they cool. Cut them too early, ly and yo u’ll have a gooey mess (not bad tasting, just impossible to photograph or serve neatly).
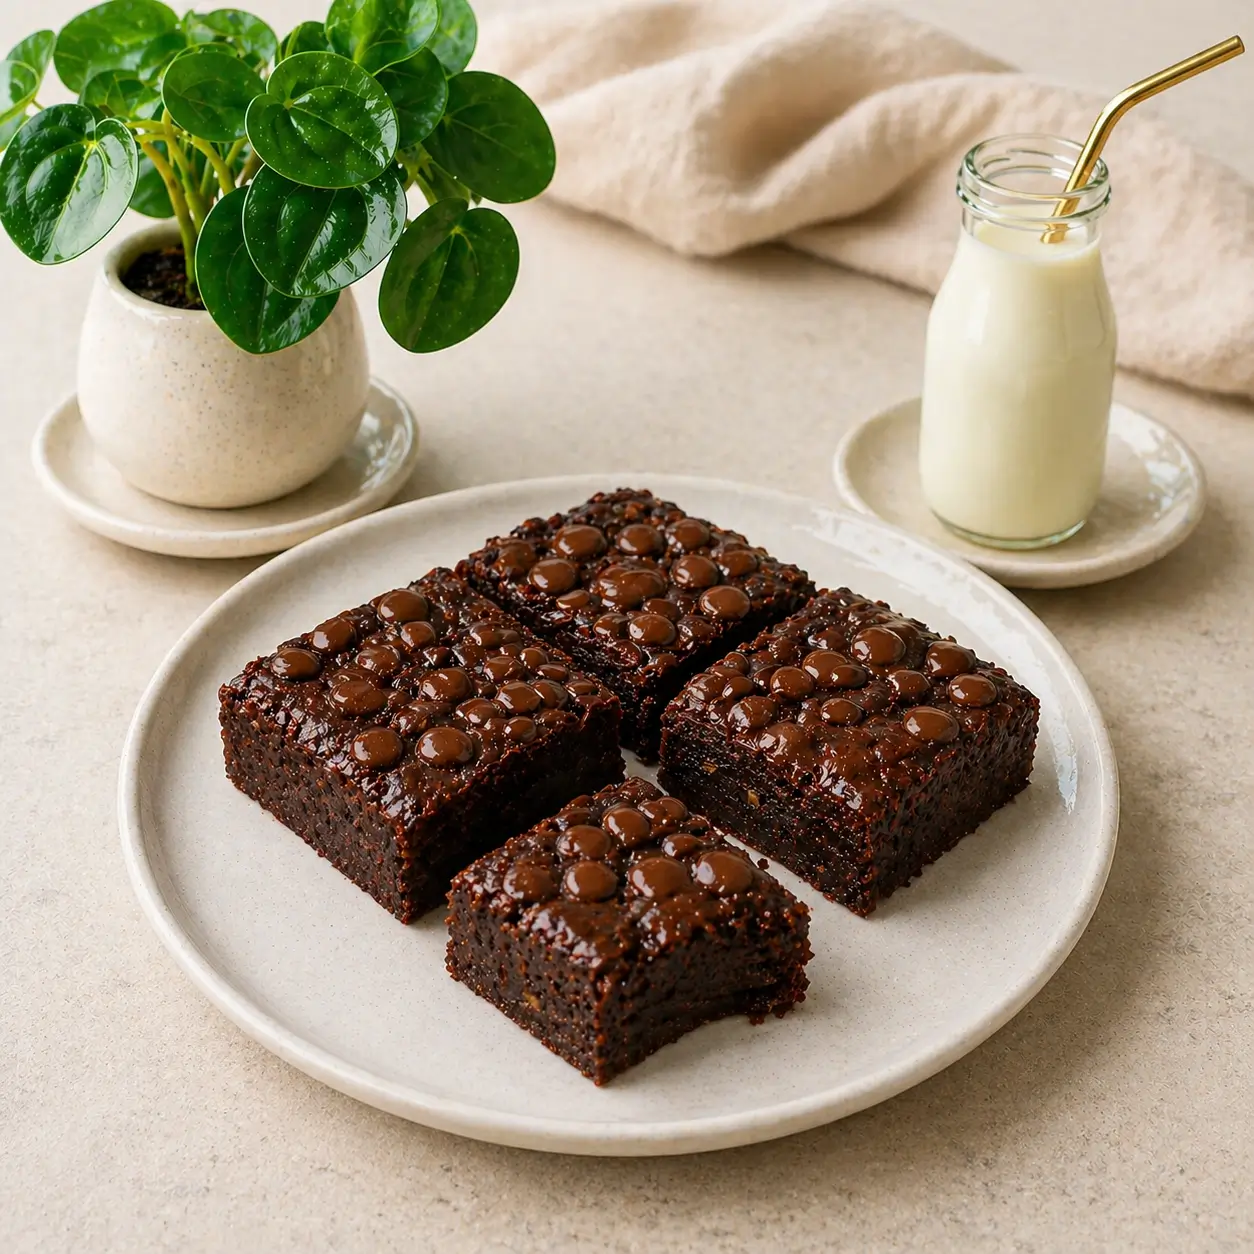
The Texture Secret — What to Expect
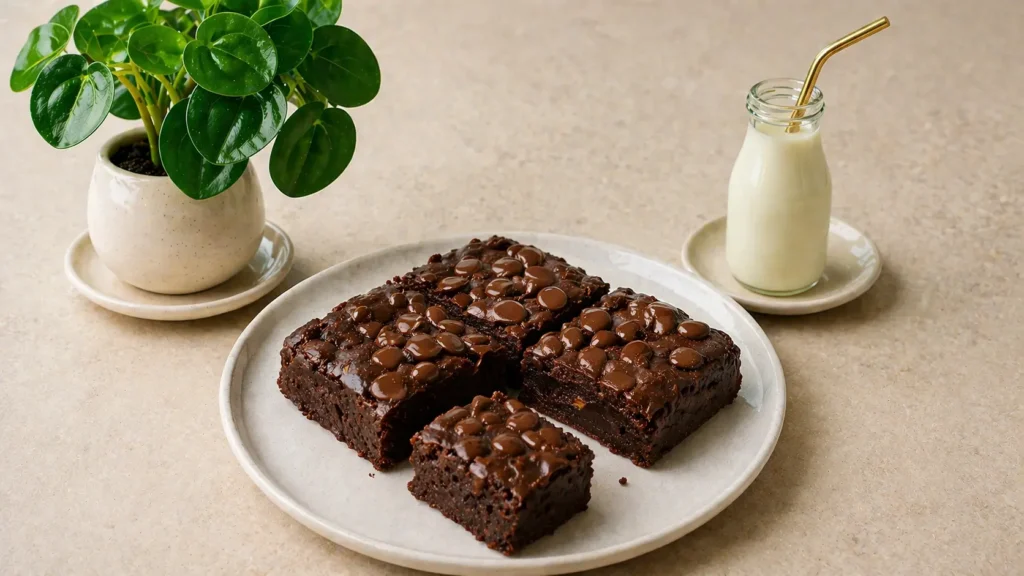
Let’s be honest: these are not going to be cakey or crisp-edged like a traditional brownie. The texture is closer to a dense, fudgy square — slightly moist, with a subtle chewiness from the banana. The top develops a very thin, almost papery crust that cracks just a little when you press it.
If you’ve never had a flourless banana-based brownie before, the best way I can describe it is: imagine something between a thick banana fudge and a moist chocolate cake. It’s genuinely good. Different, but good.
The color is deep brown, almost black, when fresh from the oven. The smell while baking is somewhere between roasted chocolate and banana bread — honestly, one of the better kitchen smells out there.
Pro Tips from Real Tries (Including One Disaster)
Tip 1: Banana ripeness is non-negotiable. I once tried this with barely-ripe bananas because I was impatient. The brownies came out pale, starchy, and weirdly bland. The natural sugar just wasn’t there. Ripe bananas — deeply spotted, soft all the way through — are what make this work as a recipe with bananas healthy enough to eat daily.
Tip 2: Don’t overbake. The biggest mistake I see (and have made myself) is pulling these out when they look fully set. By then, they’re already overdone. The center should look slightly underdone when you open the oven. Trust the residual heat.
Tip 3: Use a kitchen scale if you have one. Half a cup of almond butter sounds simple, but the density varies a lot by brand. 130g is the sweet spot. Too little fat and the brownies dry out. Too much and they won’t hold their shape.
The disaster: The first time I added maple syrup “for extra sweetness,” the batter became too wet and the brownies never properly set — just stayed this perpetually gooey slab. Still eaten (obviously), but couldn’t be sliced. If you want extra sweetness, add a tablespoon of cocoa nibs or chocolate chips instead of a liquid sweetener.
Variations Worth Trying
Once you’ve made the base recipe a couple of times, it’s easy to riff on it. Some of my favorites:
Double chocolate: Fold in 2 tablespoons of mini dark chocolate chips right before pouring into the pan. They melt slightly during baking and create little pockets of intensity throughout.
Espresso brownies: Add ½ teaspoon of instant espresso powder to the batter. It deepens the chocolate flavor without making things taste like coffee. Genuinely one of the best variations for a healthy chocolate dessert that feels grown-up.
Nut-free version: Use sunflower seed butter instead of almond butter. The brownies will turn slightly greenish inside (a chemical reaction with baking soda, you add it — skip baking soda if using sunflower seed butter). Tastes great, just… surprising the first time.
Peanut butter swirl: Reserve two tablespoons of peanut butter, drop spoonfuls on top of the batter, and swirl with a toothpick before baking. Peanut butter + banana + chocolate is its own category of perfect.
These variations also make this a natural for meal prep sweet treats — make a big batch on Sunday, try a different version each week, and you’ve always got something in the fridge.
Substitutions That Actually Work
Almond butter → peanut butter, cashew butter, tahini, or sunflower seed butter. Each changes the flavor slightly. Tahini gives an almost halvah-like undertone, which is unexpected but surprisingly good.
Cocoa powder → cacao powder. Cacao is less processed and slightly more bitter. Works perfectly here, especially if your bananas are very sweet.
Want to add eggs? One egg stirred into the batter makes the texture slightly more cakey and helps it hold together better if you’re serving it warm. It’s no longer vegan, but it’s still a no-flour dessert recipe with minimal ingredients.
For more sweetness without liquid: A tablespoon of medjool date paste blended smooth works well. Or just use more banana (3 instead of 2) and reduce the almond butter slightly.
Storage, Meal Prep & Serving Ideas
At room temperature: These keep well for up to 2 days covered on the counter, though in warm weather th, the texture gets a little too soft.
In the fridge: Stored in an airtight container, they last 5 to 6 days. The cold actually improves the texture — they firm up into these dense, almost truffle-like squares. This is my preferred way to eat them, honestly. Cold from the fridge with a cup of coffee.
Freezer: Wrap individual squares in parchment, then in a zip-lock bag. They freeze for up to 2 months and thaw in about 15 minutes at room temperature. Ideal for meal prep, sweet treats — make a double batch and freeze half.
Serving ideas: Dust lightly with cocoa powder before serving. Add a tiny drizzle of melted dark chocolate on top for a more impressive presentation. Serve alongside Greek yogurt and a handful of berries for a breakfast that feels indulgent but isn’t.
FAQ
Q: Can I make these without any nut butter?
A: The nut butter is doing a lot of structural work here, so skipping it entirely is tricky. If you need a nut-free version, sunflower seed butter is your best bet. I wouldn’t try replacing it with something like coconut oil — the texture won’t hold.
Q: Why are my brownies still gooey after 22 minutes?
A: A few possibilities: your bananas were too wet (over-ripe to the point of being almost liquefied), or your oven runs cool. Try adding 3 to 5 more minutes, but keep a close eye. Also, are you using a glass pan? Glass retains heat differently than metal; lower your temp to 325°F if so.
Q: Are these actually healthy?
A: Depends on your definition, but they’re made with whole food ingredients, no refined flour, no refined sugar, and no processed oil. They’re naturally sweetened, high in potassium from the bananas, and offer healthy fats from the nut butter. As far as healthy desserts using bananas go, this is about as clean as it gets.
Q: Can I double the recipe?
A: Yes, easily. Use a 9×13 pan and add about 5 minutes to the baking time. Check the center for doneness with a toothpick — it should come out with a few moist crumbs, not wet batter.
Q: Do I need to add any sweetener?
A: If your bananas are ripe enough, no. But if you want a little more sweetness without adding liquid, a tablespoon of maple syrup can work — just know it softens the batter slightly. Chocolate chips are my preferred way to add sweetness instead.
Q: Can I use cocoa that has sugar in it?
A: You can, but the brownies will be sweeter, and the texture can shift. Stick to unsweetened cocoa or cacao powder for the most reliable result.
Q: How do I know when they’re done baking?
A: The edges will look set and pull slightly from the sides of the pan. The center will look just barely underdone — a gentle press should feel mostly firm but with a little give. That’s your window. They’ll finish cooking from residual heat as they cool.
Now I’m curious — have you ever made a dessert with almost no ingredients and been genuinely surprised by how good it turned out? Or is there a three-ingredient recipe hiding in your kitchen right now that you’ve been meaning to try? Drop it in the comments — I’d love to hear what you’re working with.
Healthy Banana Brownies (3 Ingredient, Flourless)
Ingredients
Equipment
Method
- Preheat your oven to 350°F (175°C). Line an 8×8 inch baking pan with parchment paper, letting the edges overhang so you can lift the brownies out cleanly after baking.
- In a large bowl, mash the ripe bananas with a fork until completely smooth — no lumps. You want something close to a banana purée. This step is the base and the sweetener, so take your time here.
- Add the almond butter to the mashed bananas and stir well until fully combined. The mixture will look thick and slightly gluey at this stage — that is completely normal.
- Sift in the cocoa powder. Stir until the batter is uniformly dark and glossy. If using, add the pinch of salt and vanilla extract now. Fold in chocolate chips if making the double chocolate version.
- Pour the batter into the prepared pan. It will be thick — use the back of a spoon or spatula to spread it evenly into all corners.
- Bake for 20 to 22 minutes, until the edges are set and the center looks just slightly underdone. Do not overbake — the brownies will continue to firm up as they cool.
- Let the brownies cool in the pan for at least 20 minutes before cutting. This cooling time is essential. Lift out using the parchment overhang and cut into 9 squares.